Beginning
What are we going to build
This Self Service Guide/Lab introduces you to build Service Now Catalogs to orchestrate your F5 BIGIP Infrastructure. The diagram below outlines what is going to be build.
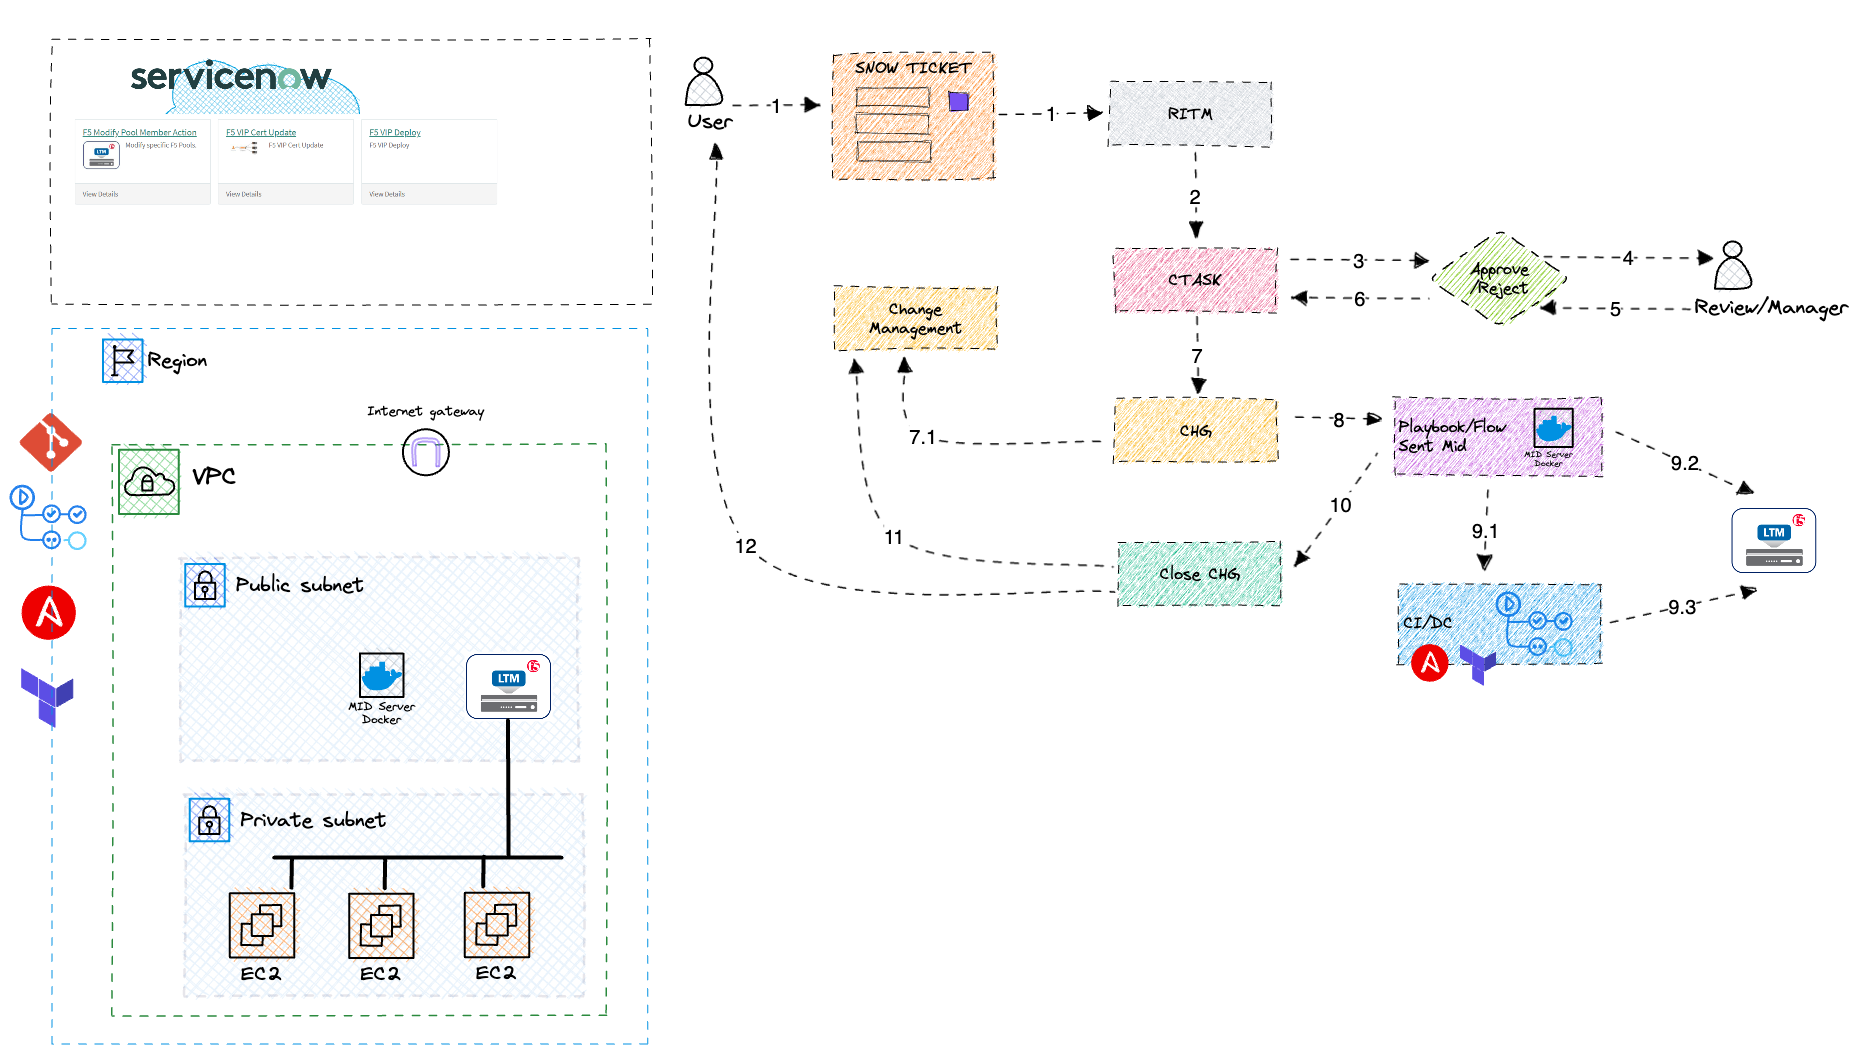
- Deploy F5 in AWS with some applications
- Deploy MID Server in AWS
- Initiate a Development service now portal
- Enable the service now features for flow designer
Start with Service Now
Service now allows you to spin up a developer environment that you can play with, unless you already have a dev environment in your work/lab.
- Register (Free) at https://developer.servicenow.com
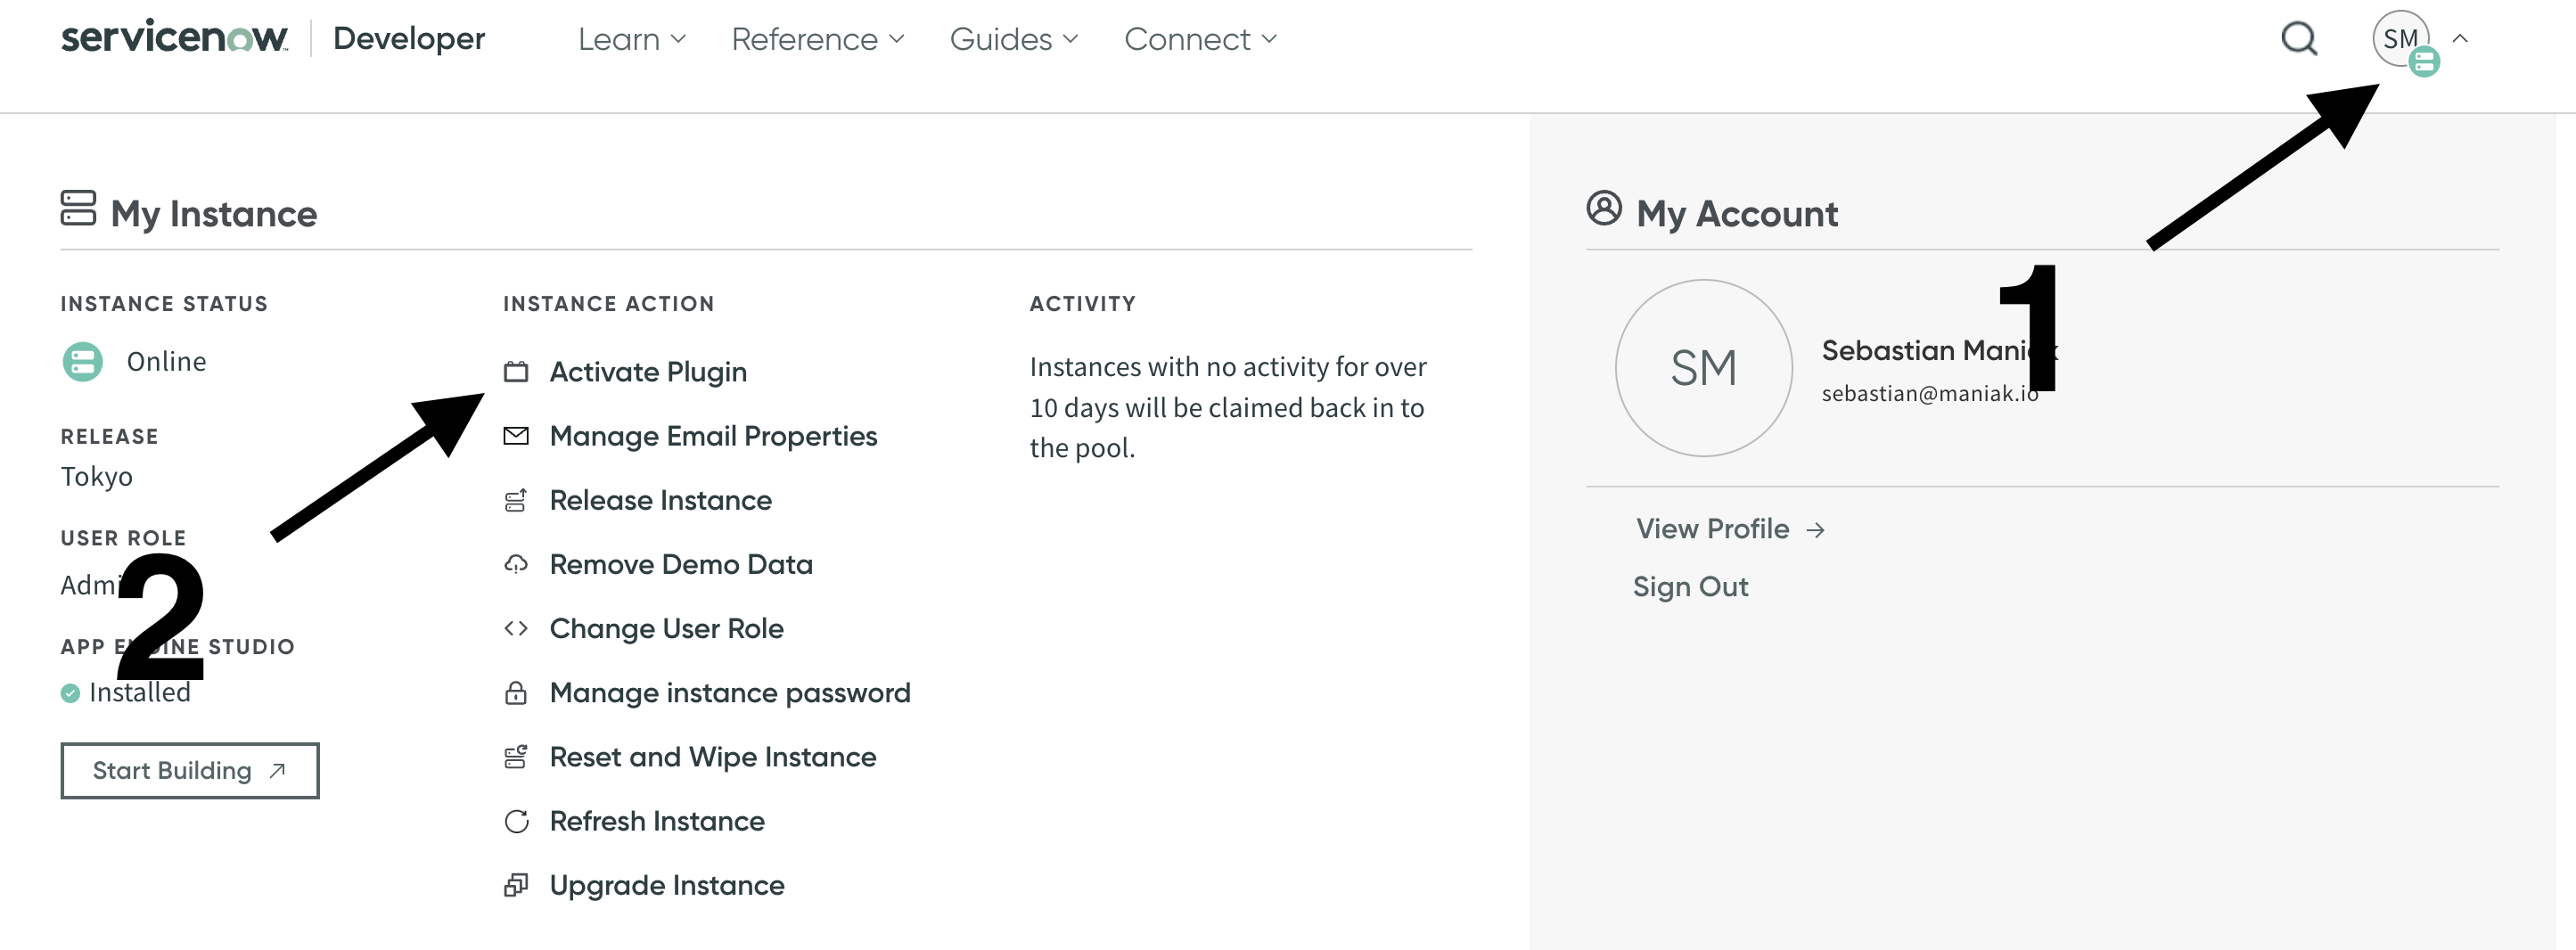
- Start a Tokyo Instance [ When you start an instance you will get a url for servicenow and credentials], it will look like this.
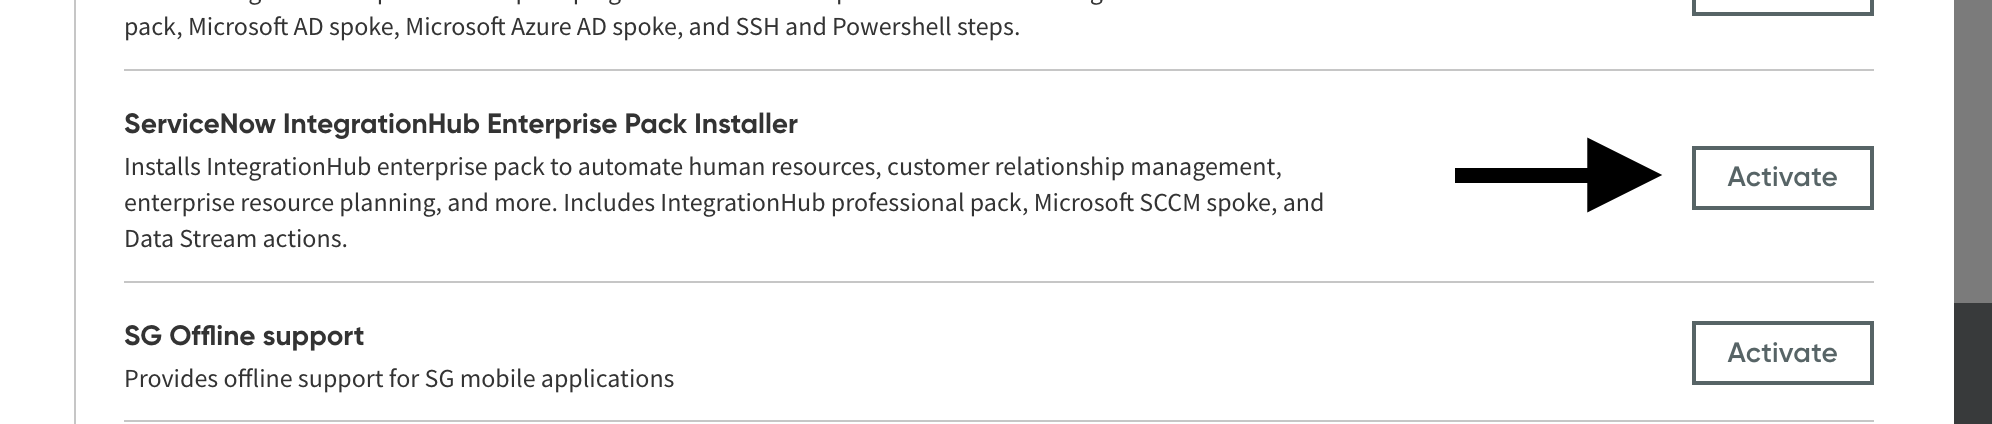
Step 1 Activate Pluggins
Once you hace access to service now and have started up your service, you will need to activate the appropriate plugins.
- Activate the ServicewNow Integration Hub Enterprise package
Validate Service Now
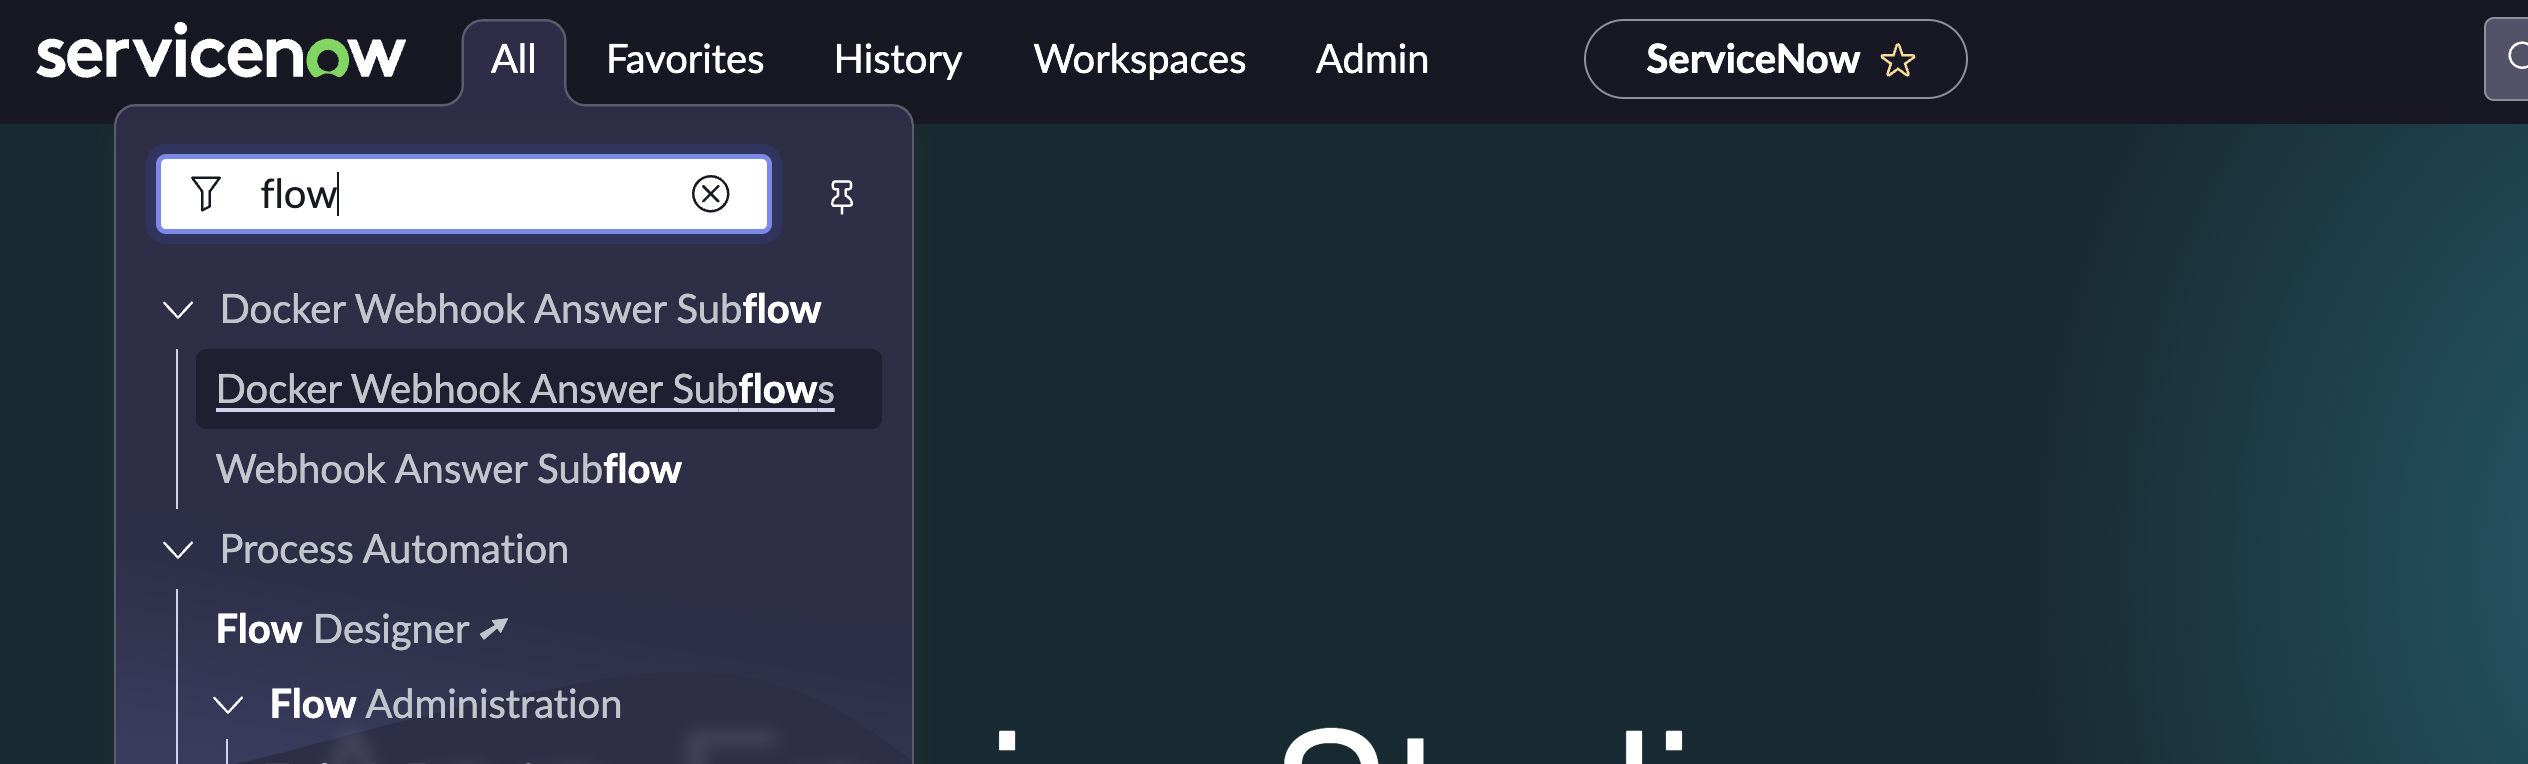
Log into you server now account and lets validate your settings.
- Log into service now and make sure you have flow designer up and running
Update my Service Now Demo Update Set
- Download the following file https://raw.githubusercontent.com/maniak-academy/f5servicenow-aws-demo/main/service%20now%20f5%20update%20set.xml
- wget https://raw.githubusercontent.com/maniak-academy/f5servicenow-aws-demo/main/service%20now%20f5%20update%20set.xml
Step 1 Import
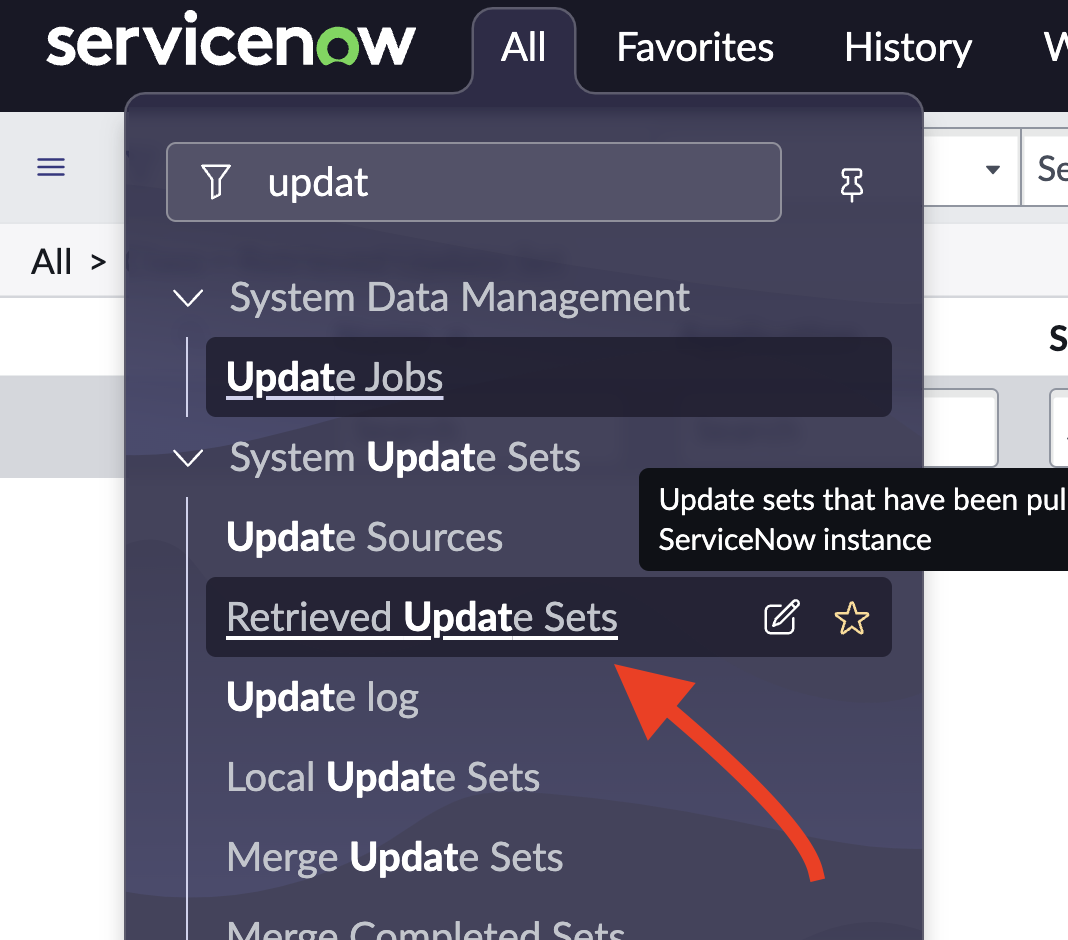
- Go to Retrieved Update Sets
- Click on ‘Import Update Set from XML’
- Find the file and import it
- Commit the update set: Open the update set you just uploaded, from the list of retrieved update sets.
- You won’t be able to sort by the “loaded” date necessarily, so you may need to search by name.
- If the update set has not been previewed already (if you don’t see the Commit Update Set button), click the Preview button.
- If there are any preview errors, you’ll have to tell the system how to handle them using the Preview errors related list.
- Click Commit Update Set.
That’s all there is to it!
…
Deploy Env
Deploy F5 AWS Environment [Optional]
This is optional, you can use your own F5 environment or use the following provided.
I built a terraform code that will deploy you a simple F5 environment in the cloud with the following tools
- F5 BIGIP
- Service Now MID Server (This is used to connect to insdie your cluster, or onprem enviromnments)
- 2 Applications that hosts httpbin webapp
Terraform code
Note you will need Terraform installed on your computer. Follow the following steps.
- Clone the repo
git clone https://github.com/maniak-academy/f5servicenow-aws-demo.git
- Edit the following files, midserver.sh and change the following parameters to match your service now developement env and your password.
- SN_HOST_NAME=
.service-now.com - PASSWORD=‘password’
sudo docker run -d --name docker-2024 --env SN_HOST_NAME=<urname>.service-now.com/ --env USER_NAME=admin --env PASSWORD='password' moers/mid-server:tokyo.latest
- Jump into the directory.
- Configure aws credentials
aws configure
- You will need to subscribe within your AWS environment to deploy the F5. Click this link https://aws.amazon.com/marketplace/pp/prodview-nlakutvltzij4
- execute terraform init, plan and apply
  terraform init
terraform plan
- If the terraform plan is successful, apply the terraform state. This will take 8 minutes to deploy an F5 in AWS.
terraform apply
- When the configuration is complete you will see the output that will provide you the following information
- F5 MGMT IP
- F5 username/password
- HTTPBIN servers
- Validate you can log into the F5 device https:ip:8443
…
Mid Server Setup
Setup the service Now mid server
To be able to access the F5 inside your datacentre or the cloud or any environment you need to deploy a MID server. A ServiceNow MID Server (Management, Instrumentation, and Discovery Server) acts as an intermediary that facilitates communication and data exchange between the ServiceNow platform and external systems, networks, and applications that reside within your local network or in private clouds. The MID Server enables ServiceNow to securely access and perform operations on business systems, even if those systems are behind firewalls or in secured environments.
Configure MID Server Profiles
Now we need to configure our mid server profiles for this lab. In production, you might want to leave these settings. Or consult your service now team.
-
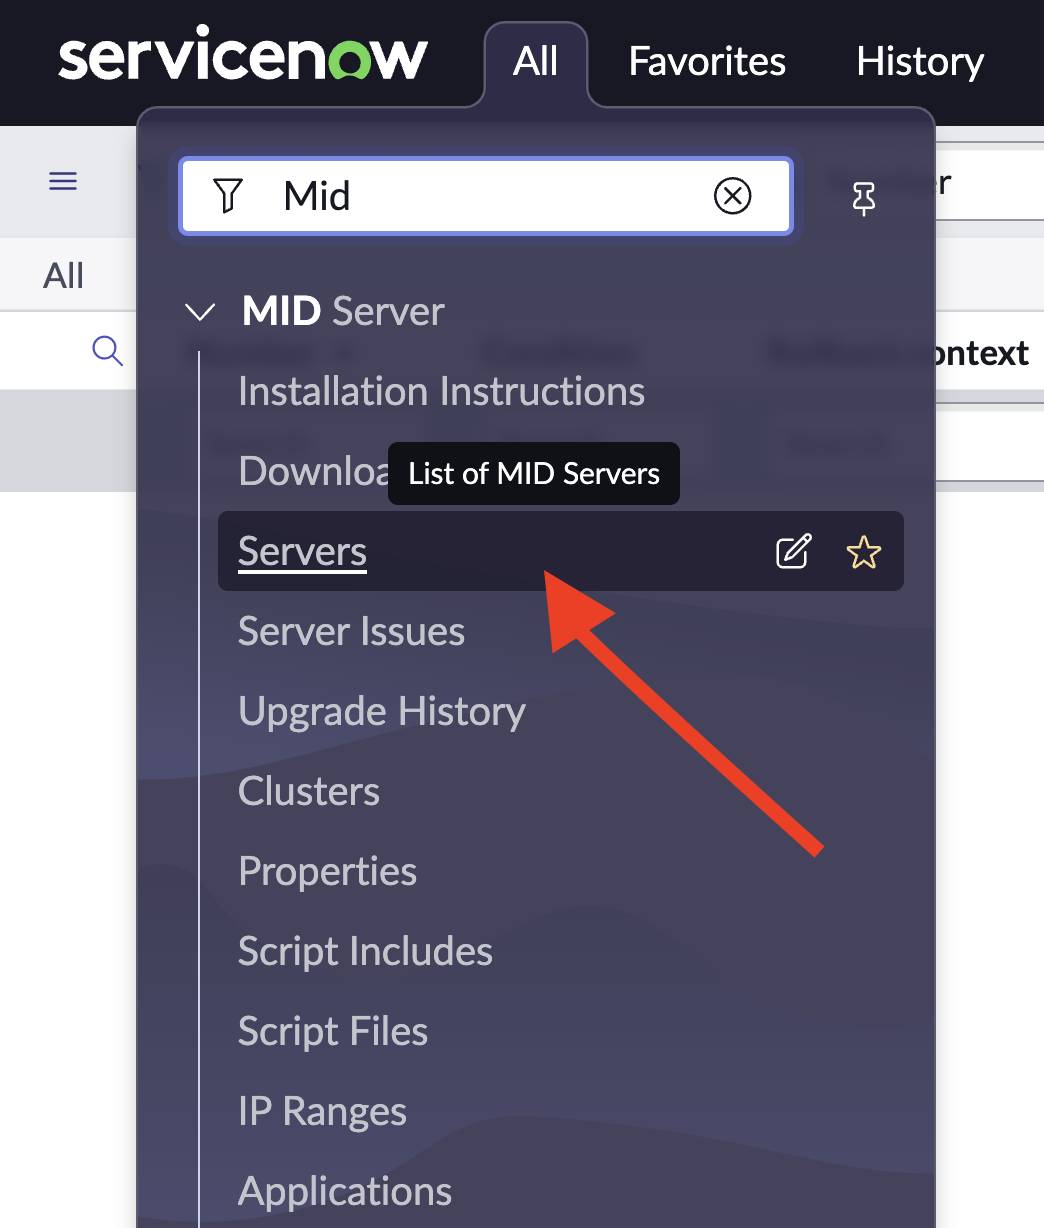
Go to your MID Server Settings within service now
-
Validate your MIDServer [ Not it might take 5 minutes to update it self]

-
Select your midserver and validate it.


- Once its validate it should look like this

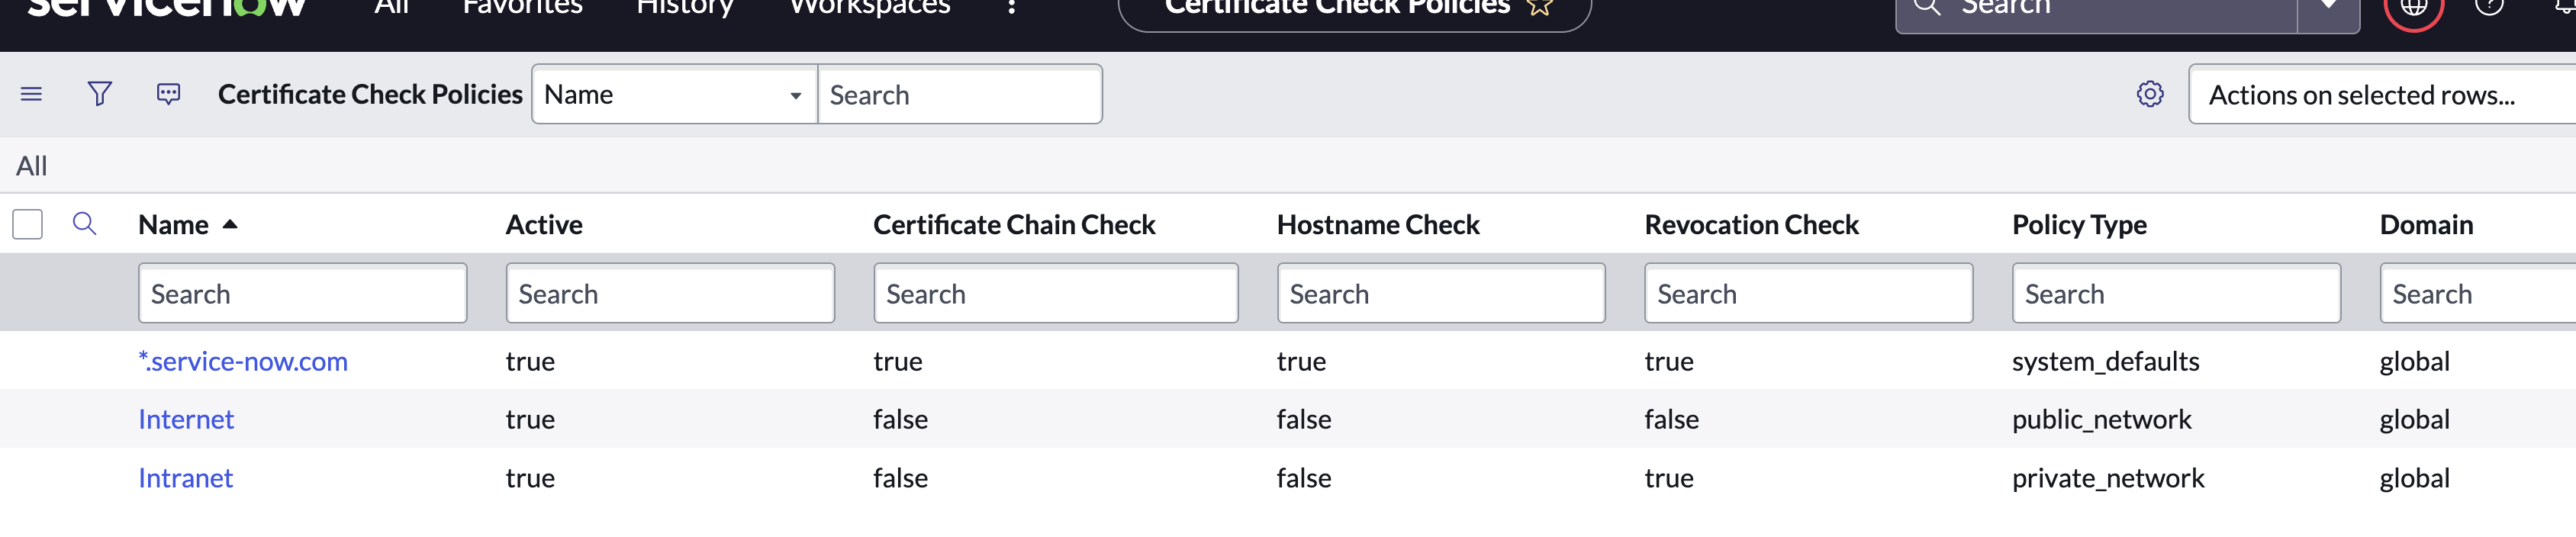
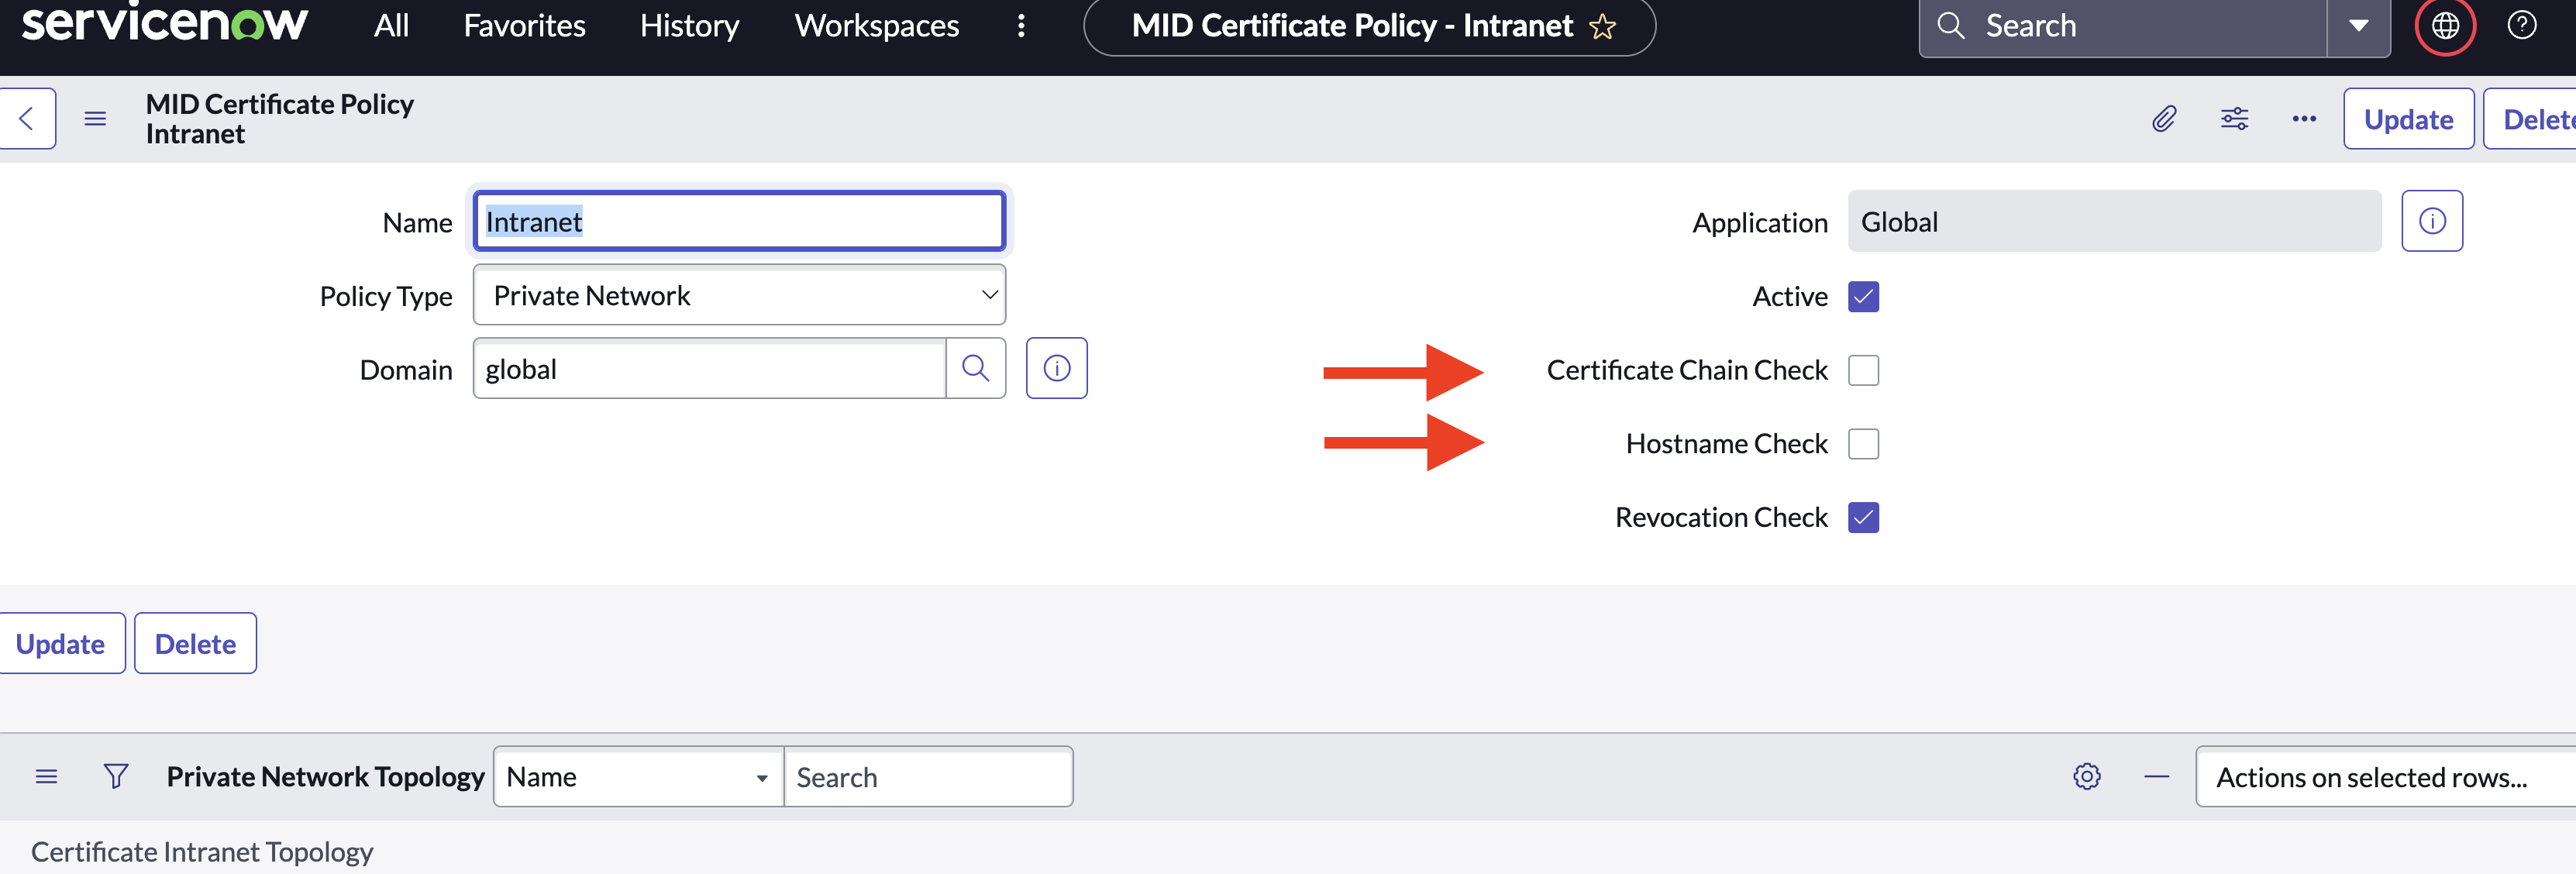
Configure your MID Security Policy
Now we need to update the MID Security Policy to allow our MID servers to make communications to specific ips and remove some checks.

- Select Intranet and uncheck Certifcate Chain Check and Hostname Check
…
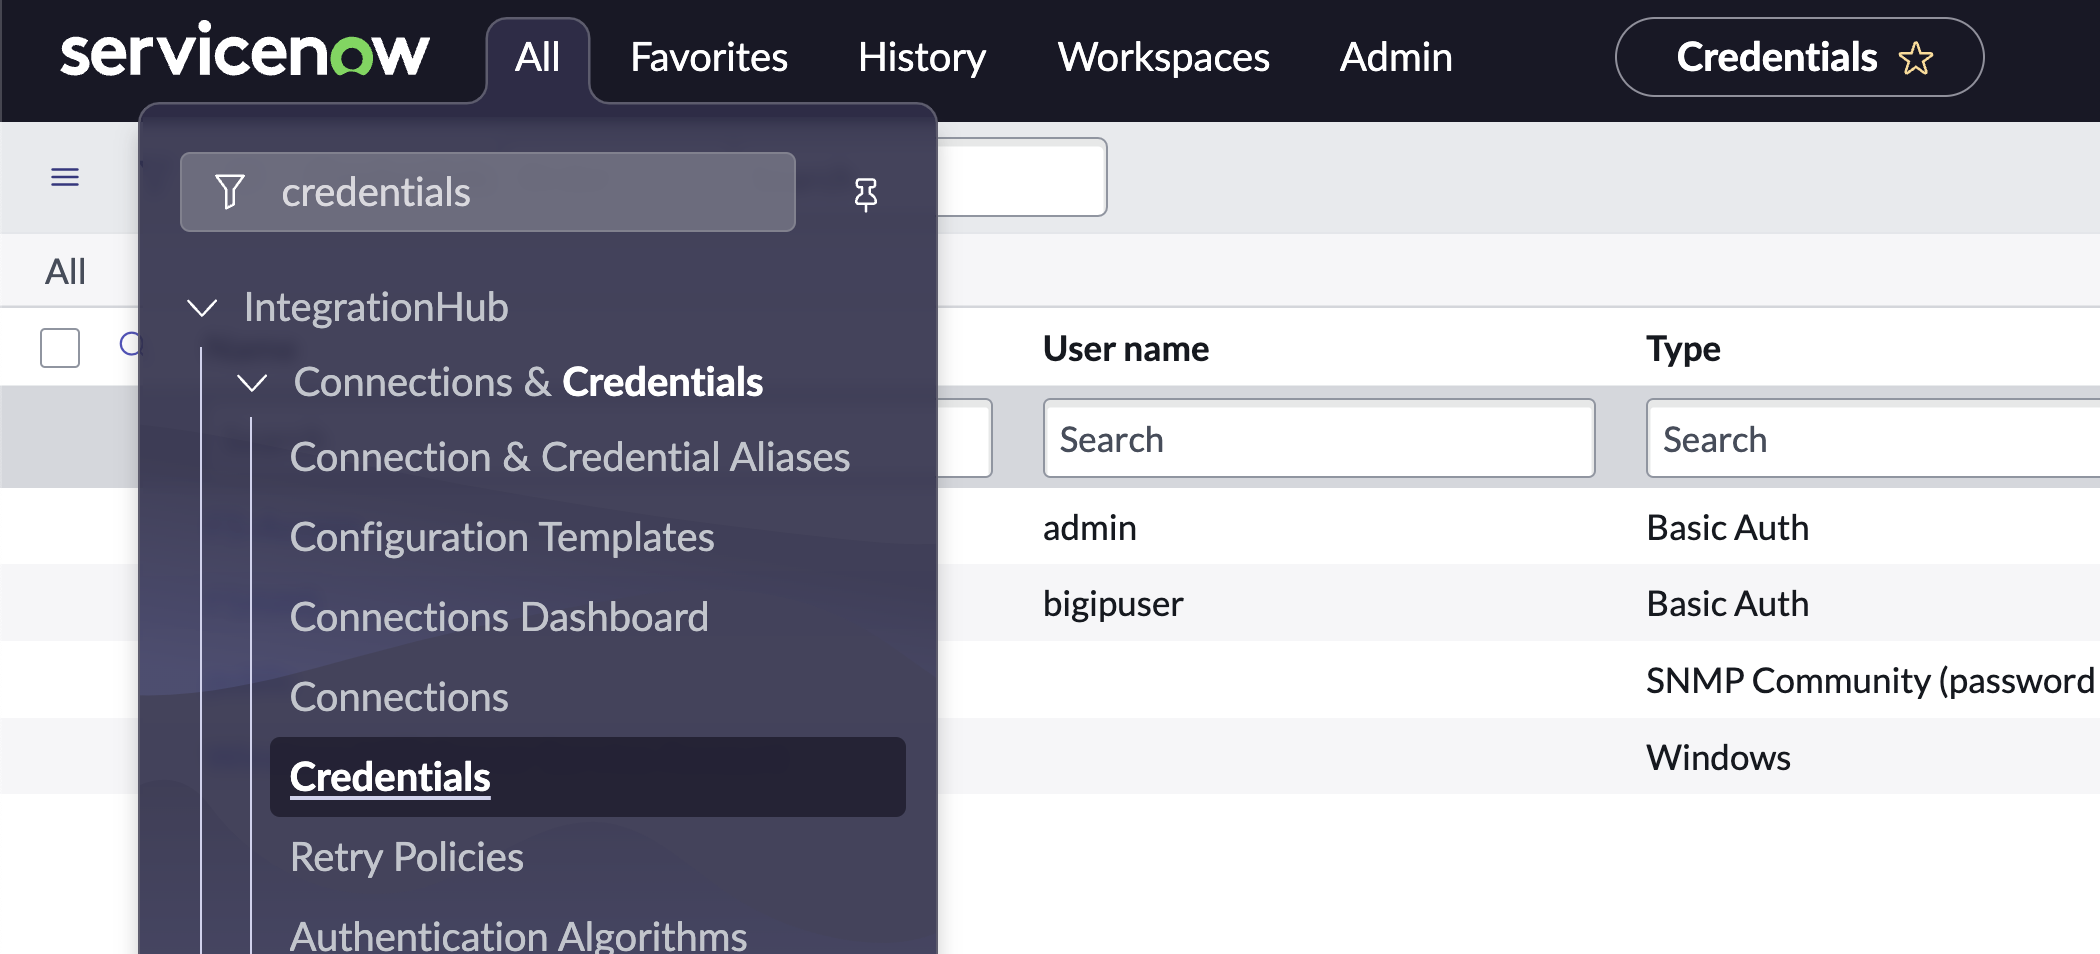
Service Now Credentials
Let’s Update our credntials
Since we uploaded a dummy environment we will need to update the credntials within Service Now.
-
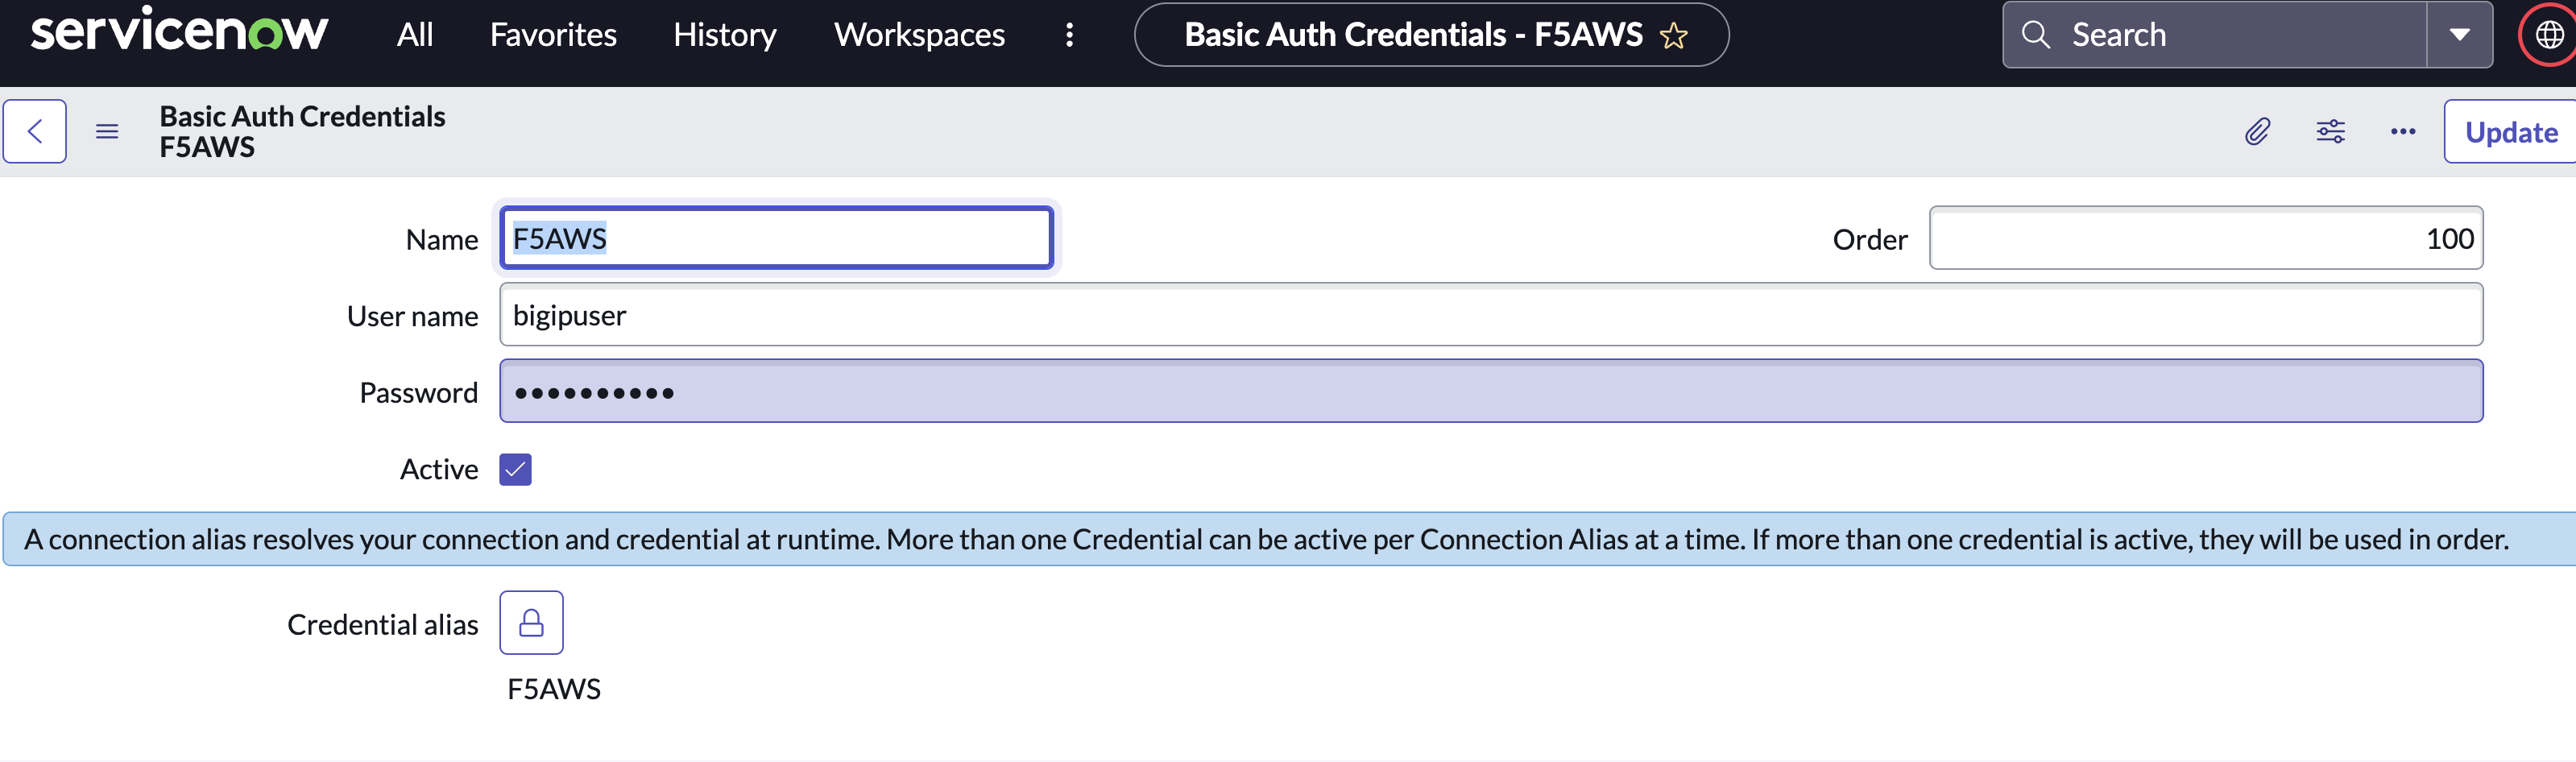
Lets update our F5 AWS Credentials, jump into “Credentials”
-
select F5AWS and update the password and click UPDATE
Update Catalogue with Your F5 IPs
Now lets update the Service Now Catalog
- Using the search “All” on the left side, type in ‘Service Catalog’
- Using the Search on the left side, type f5 and press enter
- Select the ‘F5 Build Virtual Server’
- Now lets dive in and change some parameters, so put your mouse pointer to the top and right click and go to ‘Configure Item’

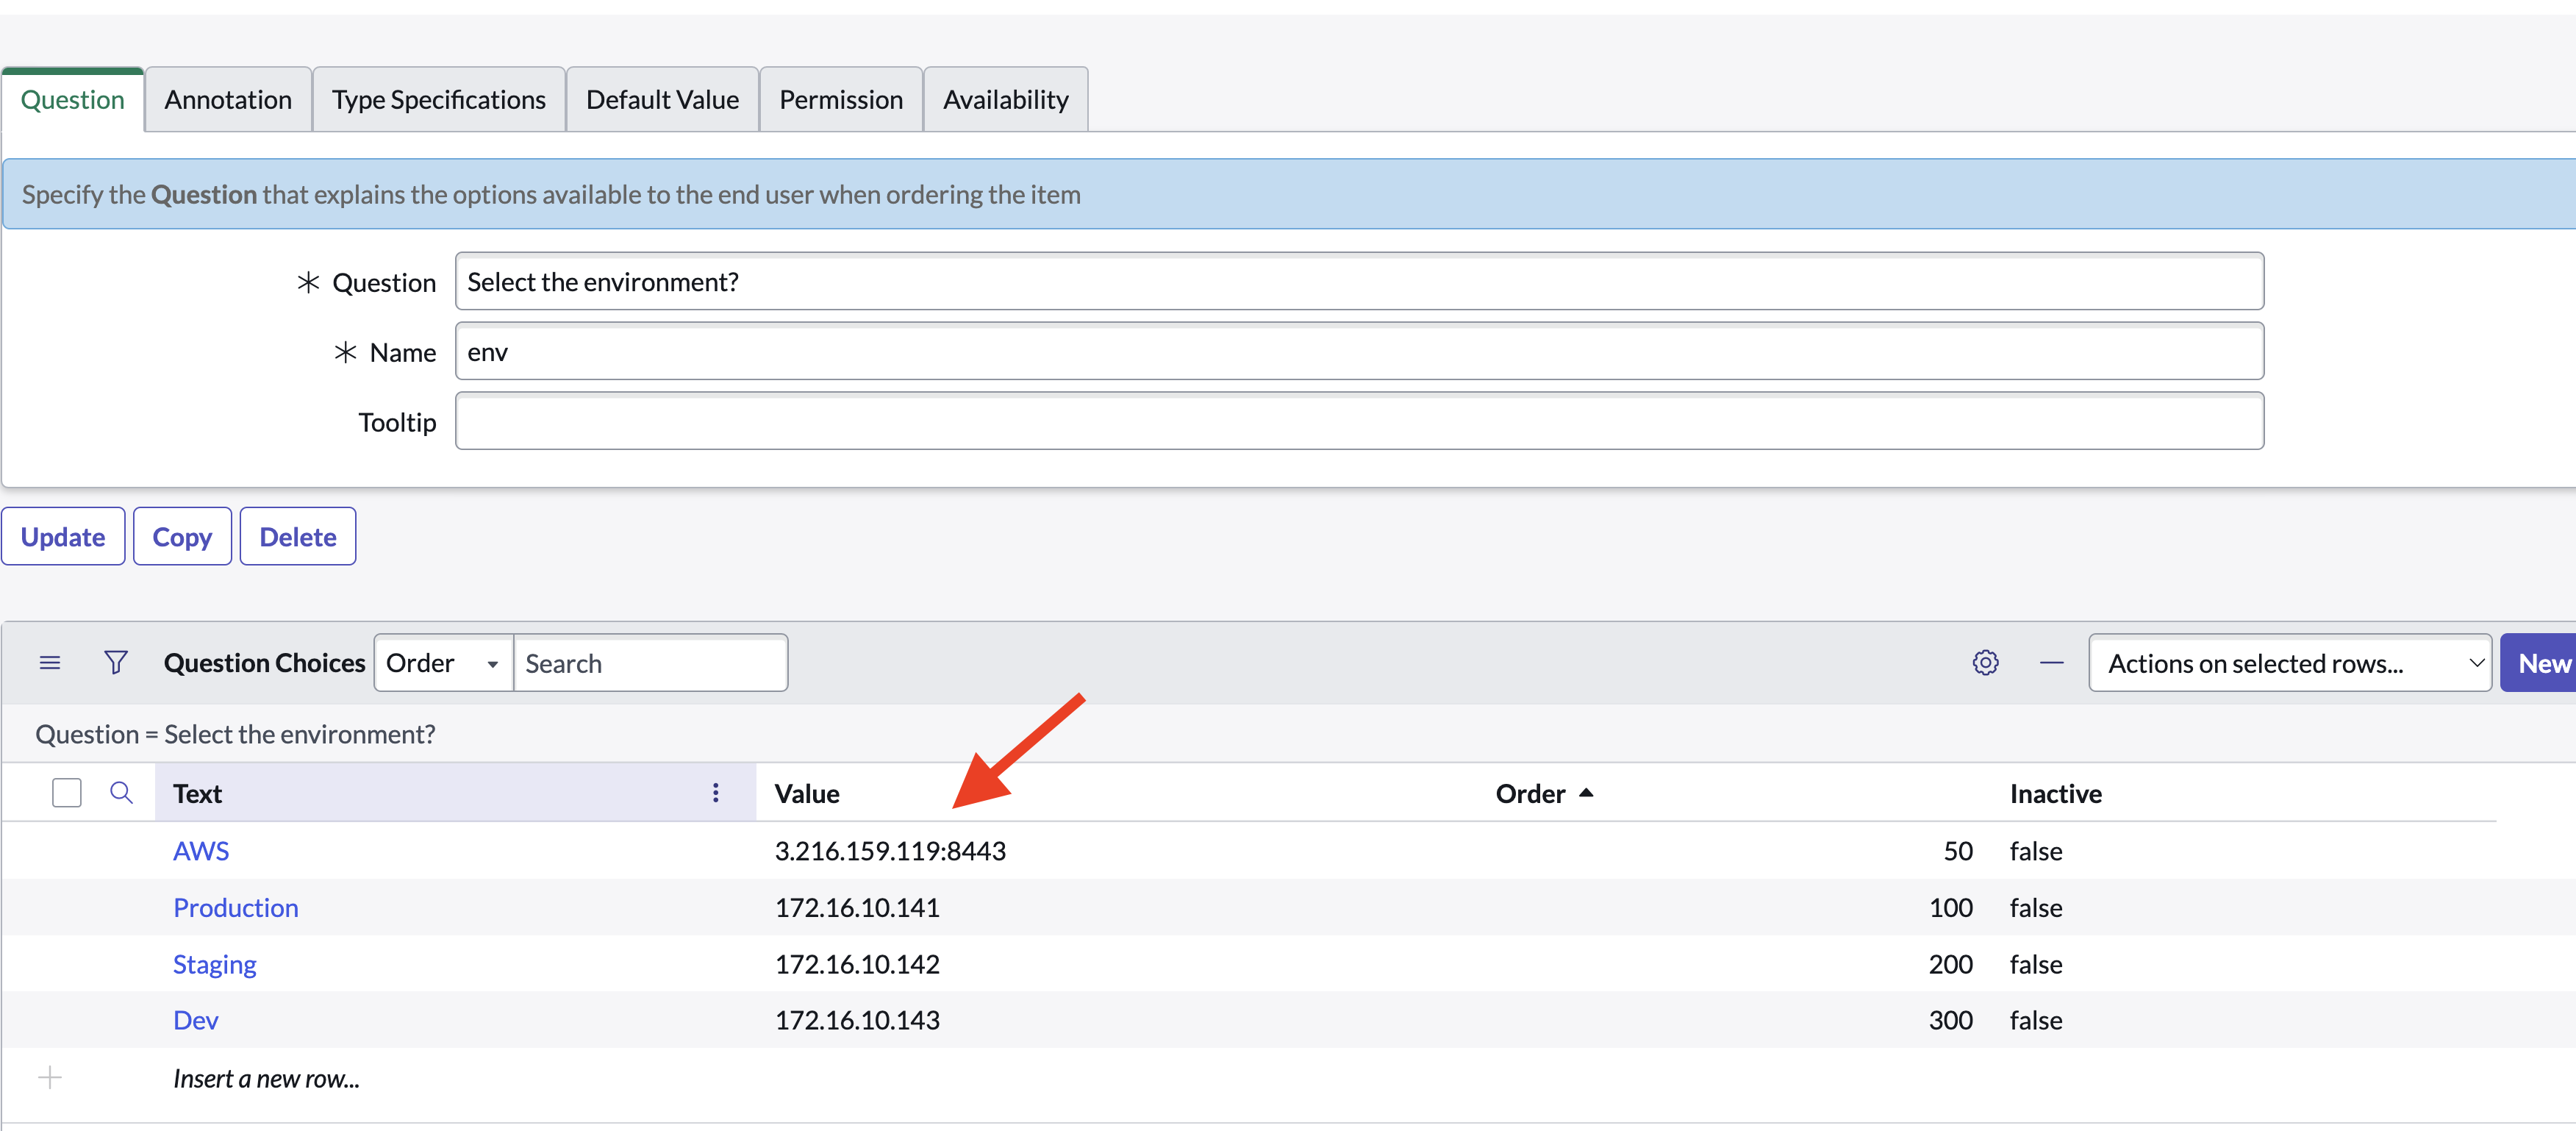
- Scroll down and find the ‘Variables’ section a ‘Env’ variable
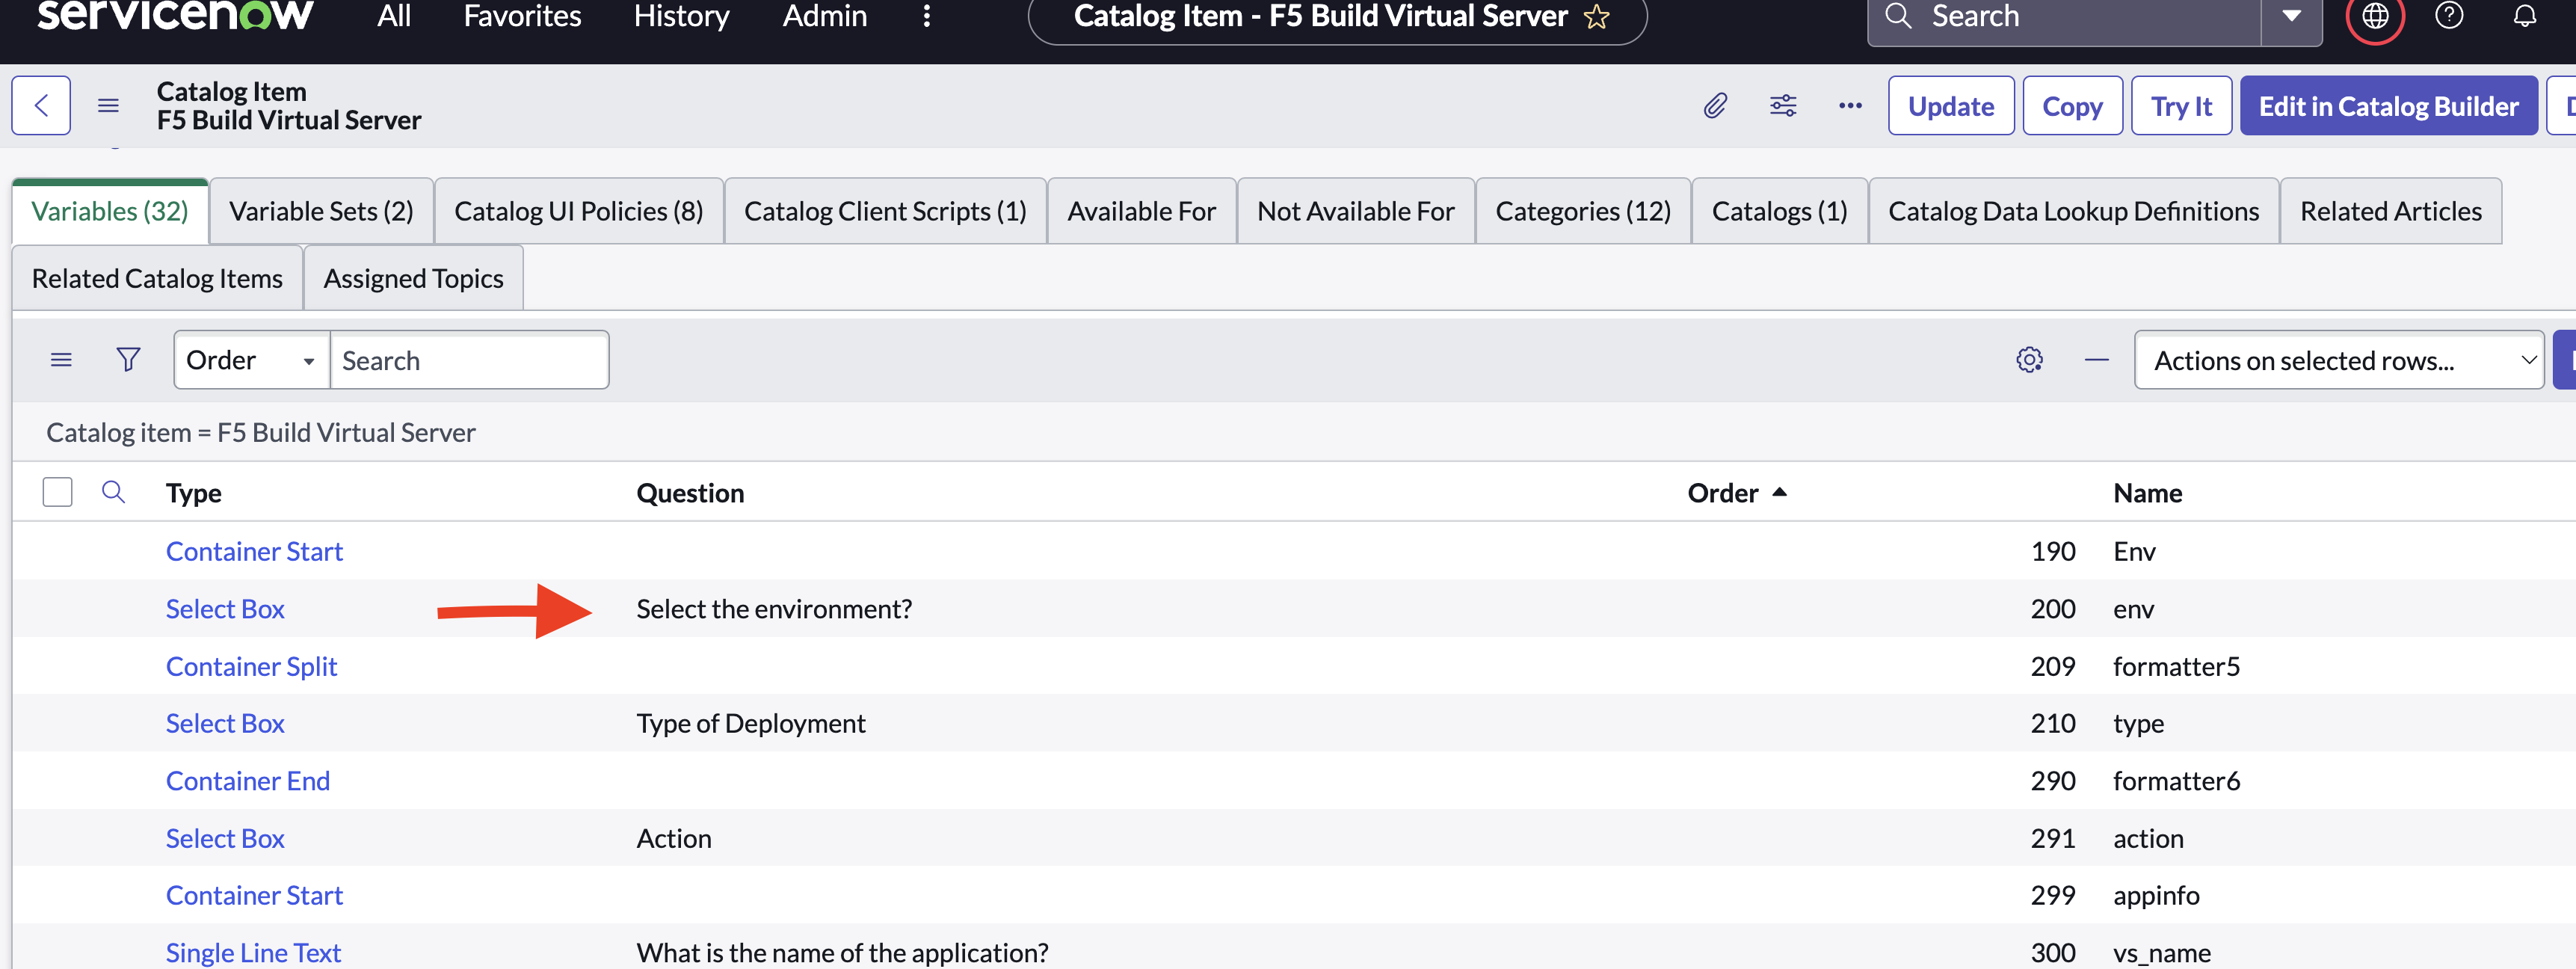
- Change the AWS environment with your BIGIP IP ADDRESS
- Click Update
…
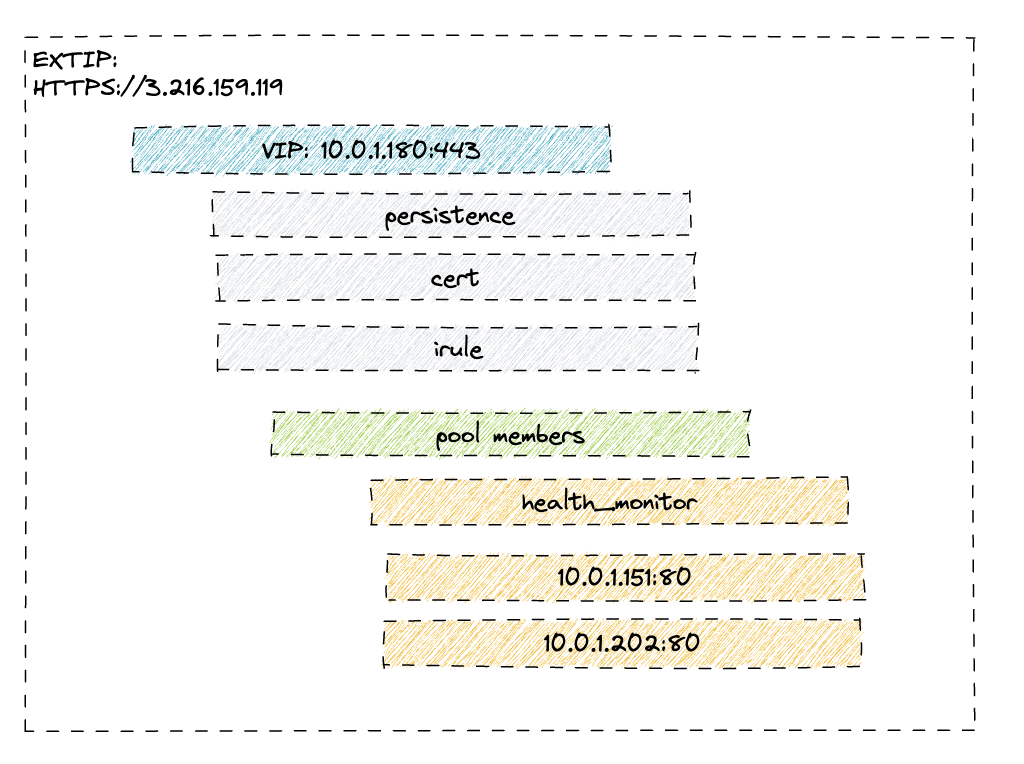
Build a Core F5 VIP
Let’s Build a Core VIP
So now that service now is setup and all the IPs and credentials are in place, let’s build a vip. Here is an image of what we will build
- Log into our service now web port https://dev202618.service-now.com/sp
- Find out ‘F5 Build Virtual Server’
Build a Core App
Lets build a HTTPS Core/Classic web application with the following parameters (not your external or node ips might be different )
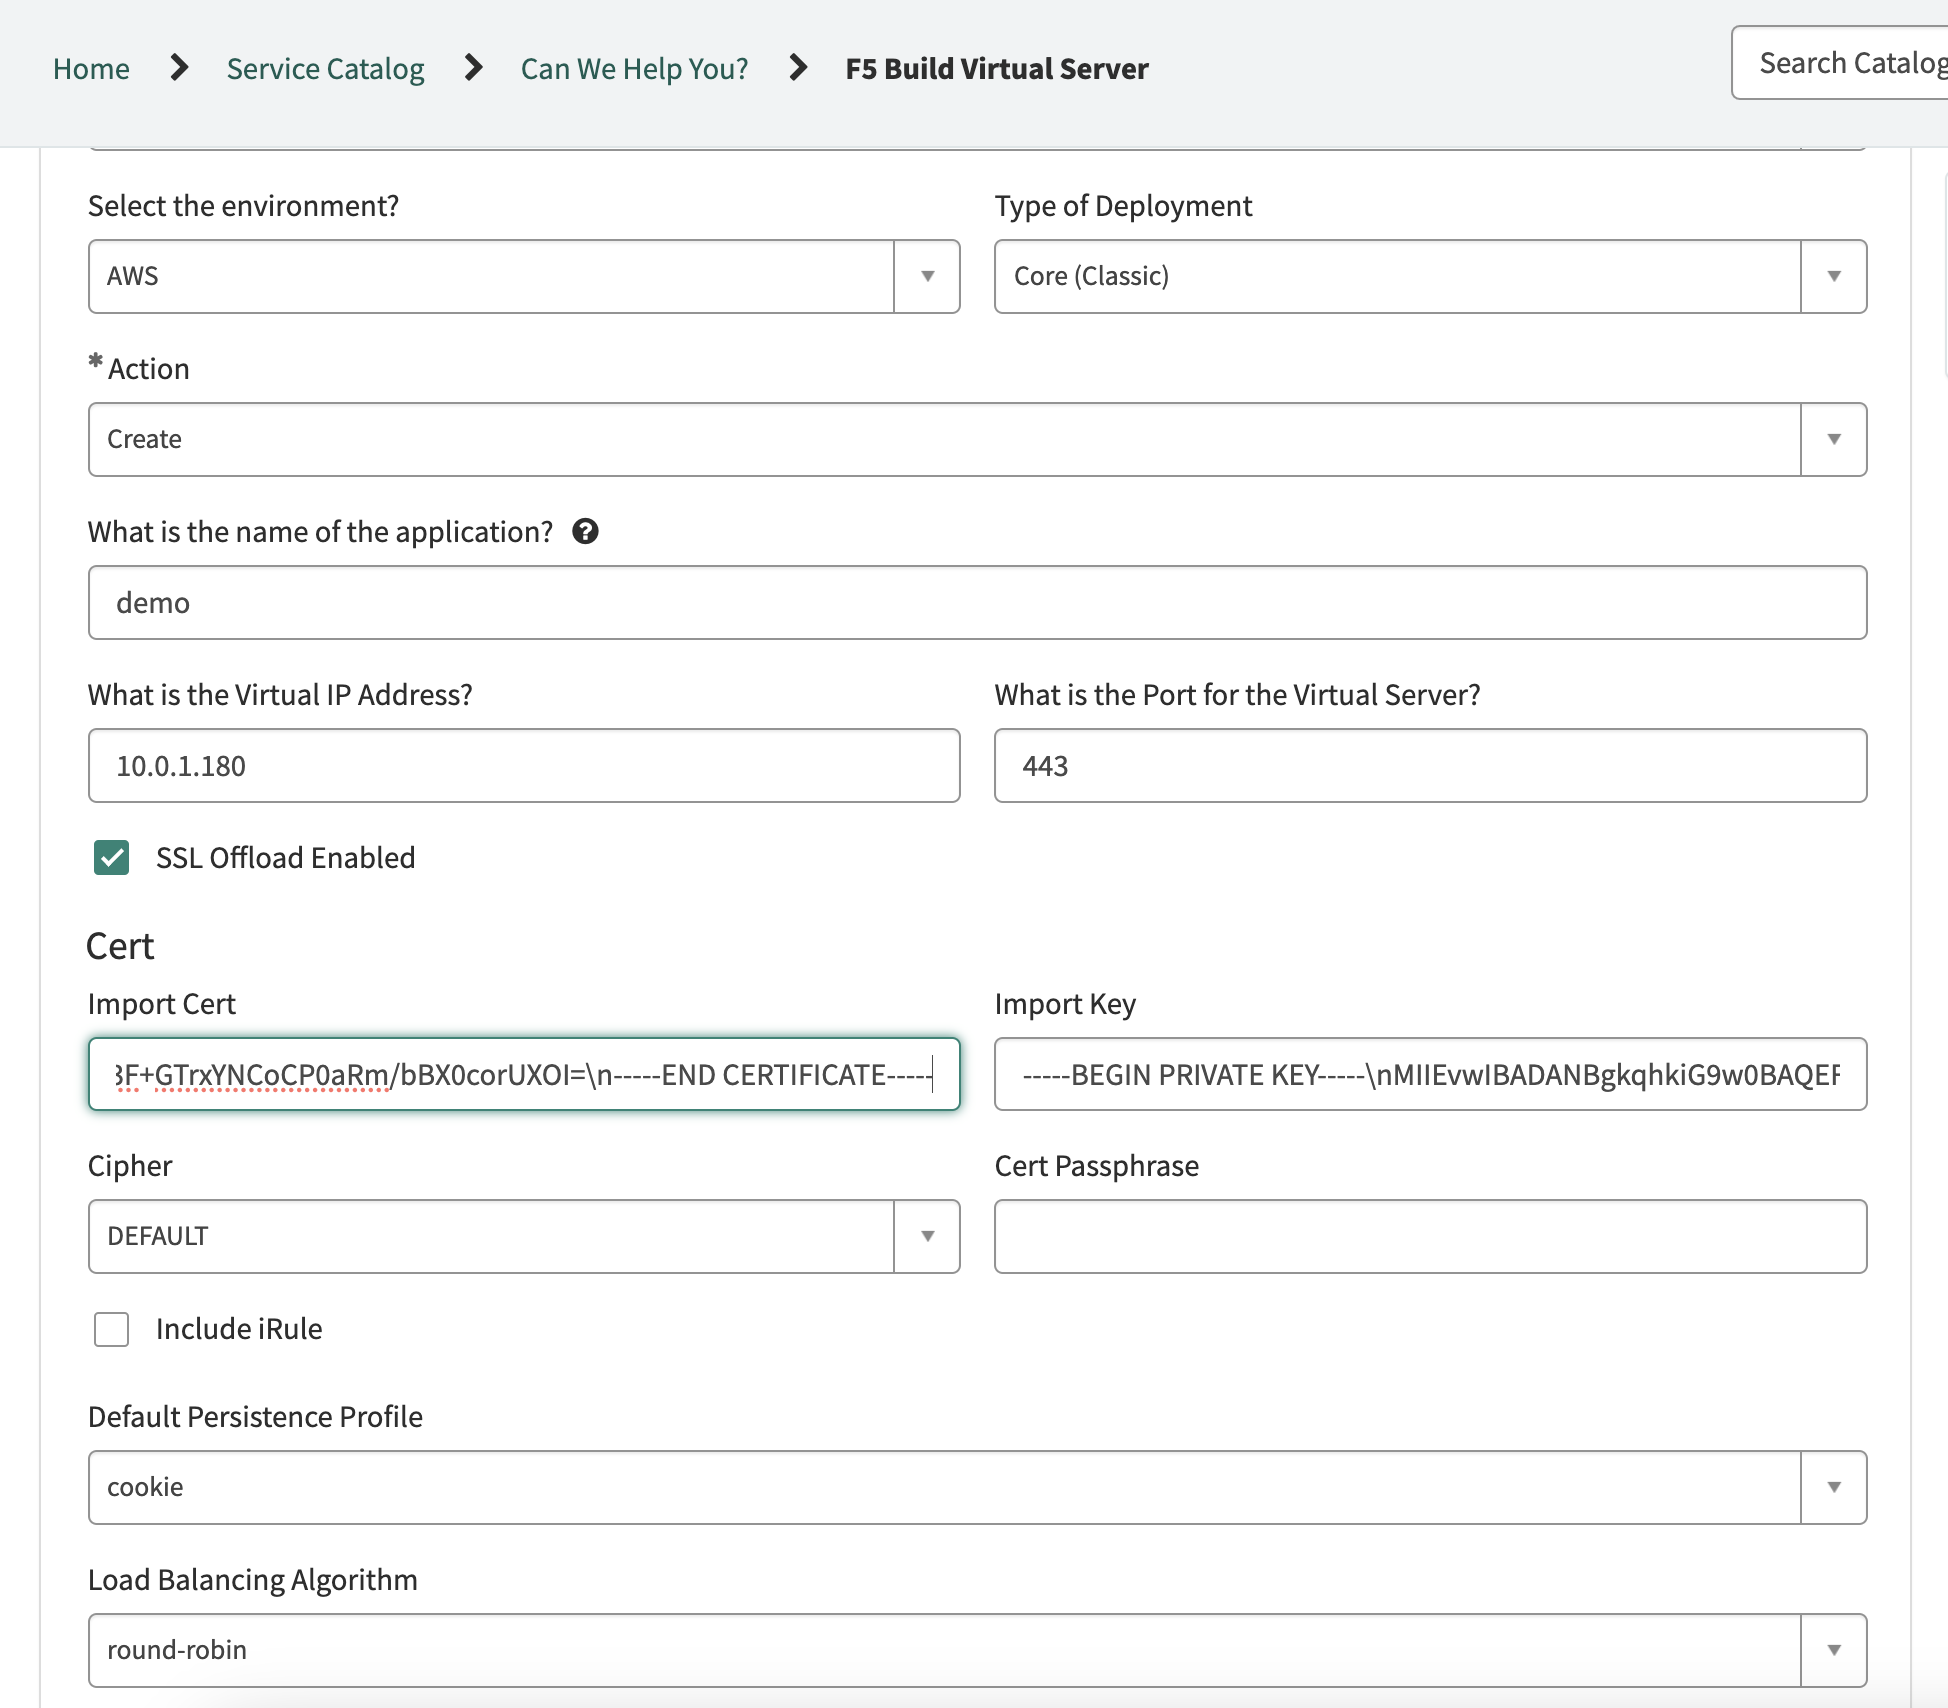
- VIP IP 10.0.1.80 443
- pool members [“10.0.1.151”,“10.0.1.202”] service port 80
- Key Examples
-----BEGIN PRIVATE KEY-----\nMIIEvwIBADANBgkqhkiG9w0BAQEFAASCBKkwggSlAgEAAoIBAQDH8w19FnKIg6KkW1mwz3wYb9mOWjVzg+NkzyGi2bAjw+keLzc6rAm4g3gV3GMigRc7tOnQMDF7mKhWLYWEELQY59QXSzhkJNN3WWef+ZY7MnpZEn/BRo6mnwaAZ/kPyXE0ge8jUXy/VkyI9jyDrBej9w9J/6busnfJ+g/db0K+RMhPkf8kO7NYO0mEU8dlTkSta1undb3L/Bs1nT8XcDNSdO3980ZTAhrkfOyFwduUvPdBaxmZS6ZNS1EX3Z6dfVKD9QaM/rPkcZzxA/Cz/ra2q6r2IaT8cj3fUr4S1W5rQEXk1NB8SGhe3ByRDTlip+5CXyXYx9OG+34AMB0+piRnAgMBAAECggEAFIjLEVYdVBTEvsFc8DIWygGuo5ZzF9ZrI368MxfNJZcomT97GgzyAJ+L1R7plXERfEHDo2xXoJxYaWVKaXo3rLkeSHgipfI8P20QndbJjXHNK9mhAi3nV4hMaCKFaxAijqRrdUKYn6PSv1wecd1aHi4wxUY6lBgDAlyqhXC4N4b1HtdwKM8Gb7IOMgj4wZJc9hunShiV4pqLJMKLz6EhZxPCpqh1JYN6PyDeBmatjOu0t9rdzbdggnzePkAzCN0kgrGFvhbhCgLONjE5yUeMigRdAtKgsKr6ADiFaBtPLNyxaAV6hQGFzMsDdTVMyEwQk7m0023u9bP6pD2b/xNOUQKBgQD6lDDy9ScoS/74VZB7RRgemN4QHMSMZtvy8eIGAmkejWghfTwwwkT7PGFU5YRsKv6RiWxFBbb+7ytEhlIgt7T5nblQpoEsd5uTEXVDzYHjSo4i7WMTvn2pgtn8SF1DxlgDPCiD2Se4jxZ73uTs9t1jLqE+GIjH56GTNu0y2nrFMQKBgQDMRnRtQst3kKhXzCYQtlWVhrsmsdEWMTWefMJBxELG8Mj0C0tkrlNuZ+FHDk7RxRiTMC90ABvmiAHb4NBOhYa4pEckitHF/4vNn+gi7N1n2sPmIK7DUu0BBaKXbuPV0VtsL5JIBDZkwUS2/tjI9zK/RS12XG4x61lfHD74SU39FwKBgQDStSxYEQflXcpAforo7Vfz2q3YtKgePBw2NWnPjdVhKJ1ok8u6YJHrBYH/BqUM5DZ+oSVXARA5XVpv29dRxci7ogKDrA+xGb7Ls4F9C2FuhHHzMtT+dE9s7ChreVpbtHyr87lJ7Z/2FPReIzczf/73+O0Dr1PNbZyzkxtwiMF18QKBgQCxvmhWHfWvHubsJk3E4vLLPcWg4L5/Ieh29DWPRjeYpTEl8KH0hB9ChQ8nZdK9glNk11ujAulECXocmZyHhnX4ObFRoZzwPPCnxgkWQqZQVLF6j1uhx4lEB2Q3ghyrExUKqMYO9eNifizNUijNjRLSDV6Gi9yygQdt08UTA63hlwKBgQCehWXUnZh9bN4eU1Bff3KXShrfytoxEhVH6eiV7Edt6/E1MWOoSwn3TjU91znPtNFZ6/KUAL/WOLgW/3IYRs4/Nxad3nQEqjjhKs0KdLzxTM+I6jTP0cnT9z75EgwwD51v5S1miHIPVhXWipngP6oPwgw6rDwDOT+vRFMyibaKJQ==\n-----END PRIVATE KEY-----
- Cert example
-----BEGIN CERTIFICATE-----\nMIIDUjCCAjqgAwIBAgIEGXxE4jANBgkqhkiG9w0BAQsFADBrMQswCQYDVQQGEwJDQTEMMAoGA1UECBMDb250MRAwDgYDVQQHEwdUb3JvbnRvMRIwEAYDVQQKEwlNeUNvbXBhbnkxDjAMBgNVBAsTBU15T3JnMRgwFgYDVQQDEw9kZW1vLm1hbmlhay5sYWIwHhcNMjMwNzIxMDI0MTM4WhcNMzMwNzE4MDI0MTM4WjBrMQswCQYDVQQGEwJDQTEMMAoGA1UECBMDb250MRAwDgYDVQQHEwdUb3JvbnRvMRIwEAYDVQQKEwlNeUNvbXBhbnkxDjAMBgNVBAsTBU15T3JnMRgwFgYDVQQDEw9kZW1vLm1hbmlhay5sYWIwggEiMA0GCSqGSIb3DQEBAQUAA4IBDwAwggEKAoIBAQDH8w19FnKIg6KkW1mwz3wYb9mOWjVzg+NkzyGi2bAjw+keLzc6rAm4g3gV3GMigRc7tOnQMDF7mKhWLYWEELQY59QXSzhkJNN3WWef+ZY7MnpZEn/BRo6mnwaAZ/kPyXE0ge8jUXy/VkyI9jyDrBej9w9J/6busnfJ+g/db0K+RMhPkf8kO7NYO0mEU8dlTkSta1undb3L/Bs1nT8XcDNSdO3980ZTAhrkfOyFwduUvPdBaxmZS6ZNS1EX3Z6dfVKD9QaM/rPkcZzxA/Cz/ra2q6r2IaT8cj3fUr4S1W5rQEXk1NB8SGhe3ByRDTlip+5CXyXYx9OG+34AMB0+piRnAgMBAAEwDQYJKoZIhvcNAQELBQADggEBABkaaW2F8kS4KoNGWoPv10U44Fkv9eFkR+sm5FeykUyhRR9g4CZVS+8RtTliYnqiLzy8NJVhZdgtkI7XlNyNjAD/gCu326zsmXJE3+R7XeyaPV9XEBrFZWVcMS7Ol0kJjGUIIYbBKdOFBC/XkHC+H5hPmXNRMVg7KKq5hj6h47xLg7Ugll4DwbYNECiIOK6+771vwhVkdseCeFbB/RTSLGbhxvD6jwY/pfQ1TJq3OOQIR9iAeW3qvyTfaiyOa0dwHrvKnHMegid05i3Hgf9Bp/tn8tUNNKhCOJ+eC4SRUNbgzjEg2fa0qnaK6M3F+GTrxYNCoCP0aRm/bBX0corUXOI=\n-----END CERTIFICATE-----
Order/Approve and check if it worked.
Build AS3 Configurations
Let’s Build a AS3 VIP
Now lets get into building a AS3 VIP.
- Log into our service now web port https://dev202618.service-now.com/sp
- Find out ‘F5 Build Virtual Server’
- Type of Deployment select Declarative (AS3)
- Action, select ‘Create’
- Give the application name (ex. demoas3)
- Give the name of the tenant (ex. tenant_demoas3)
- VIP IP 10.0.1.80 443
- pool members [“10.0.1.151”,“10.0.1.202”] service port 80
- Key Examples
-----BEGIN PRIVATE KEY-----\nMIIEvwIBADANBgkqhkiG9w0BAQEFAASCBKkwggSlAgEAAoIBAQDH8w19FnKIg6KkW1mwz3wYb9mOWjVzg+NkzyGi2bAjw+keLzc6rAm4g3gV3GMigRc7tOnQMDF7mKhWLYWEELQY59QXSzhkJNN3WWef+ZY7MnpZEn/BRo6mnwaAZ/kPyXE0ge8jUXy/VkyI9jyDrBej9w9J/6busnfJ+g/db0K+RMhPkf8kO7NYO0mEU8dlTkSta1undb3L/Bs1nT8XcDNSdO3980ZTAhrkfOyFwduUvPdBaxmZS6ZNS1EX3Z6dfVKD9QaM/rPkcZzxA/Cz/ra2q6r2IaT8cj3fUr4S1W5rQEXk1NB8SGhe3ByRDTlip+5CXyXYx9OG+34AMB0+piRnAgMBAAECggEAFIjLEVYdVBTEvsFc8DIWygGuo5ZzF9ZrI368MxfNJZcomT97GgzyAJ+L1R7plXERfEHDo2xXoJxYaWVKaXo3rLkeSHgipfI8P20QndbJjXHNK9mhAi3nV4hMaCKFaxAijqRrdUKYn6PSv1wecd1aHi4wxUY6lBgDAlyqhXC4N4b1HtdwKM8Gb7IOMgj4wZJc9hunShiV4pqLJMKLz6EhZxPCpqh1JYN6PyDeBmatjOu0t9rdzbdggnzePkAzCN0kgrGFvhbhCgLONjE5yUeMigRdAtKgsKr6ADiFaBtPLNyxaAV6hQGFzMsDdTVMyEwQk7m0023u9bP6pD2b/xNOUQKBgQD6lDDy9ScoS/74VZB7RRgemN4QHMSMZtvy8eIGAmkejWghfTwwwkT7PGFU5YRsKv6RiWxFBbb+7ytEhlIgt7T5nblQpoEsd5uTEXVDzYHjSo4i7WMTvn2pgtn8SF1DxlgDPCiD2Se4jxZ73uTs9t1jLqE+GIjH56GTNu0y2nrFMQKBgQDMRnRtQst3kKhXzCYQtlWVhrsmsdEWMTWefMJBxELG8Mj0C0tkrlNuZ+FHDk7RxRiTMC90ABvmiAHb4NBOhYa4pEckitHF/4vNn+gi7N1n2sPmIK7DUu0BBaKXbuPV0VtsL5JIBDZkwUS2/tjI9zK/RS12XG4x61lfHD74SU39FwKBgQDStSxYEQflXcpAforo7Vfz2q3YtKgePBw2NWnPjdVhKJ1ok8u6YJHrBYH/BqUM5DZ+oSVXARA5XVpv29dRxci7ogKDrA+xGb7Ls4F9C2FuhHHzMtT+dE9s7ChreVpbtHyr87lJ7Z/2FPReIzczf/73+O0Dr1PNbZyzkxtwiMF18QKBgQCxvmhWHfWvHubsJk3E4vLLPcWg4L5/Ieh29DWPRjeYpTEl8KH0hB9ChQ8nZdK9glNk11ujAulECXocmZyHhnX4ObFRoZzwPPCnxgkWQqZQVLF6j1uhx4lEB2Q3ghyrExUKqMYO9eNifizNUijNjRLSDV6Gi9yygQdt08UTA63hlwKBgQCehWXUnZh9bN4eU1Bff3KXShrfytoxEhVH6eiV7Edt6/E1MWOoSwn3TjU91znPtNFZ6/KUAL/WOLgW/3IYRs4/Nxad3nQEqjjhKs0KdLzxTM+I6jTP0cnT9z75EgwwD51v5S1miHIPVhXWipngP6oPwgw6rDwDOT+vRFMyibaKJQ==\n-----END PRIVATE KEY-----
- Cert example
-----BEGIN CERTIFICATE-----\nMIIDUjCCAjqgAwIBAgIEGXxE4jANBgkqhkiG9w0BAQsFADBrMQswCQYDVQQGEwJDQTEMMAoGA1UECBMDb250MRAwDgYDVQQHEwdUb3JvbnRvMRIwEAYDVQQKEwlNeUNvbXBhbnkxDjAMBgNVBAsTBU15T3JnMRgwFgYDVQQDEw9kZW1vLm1hbmlhay5sYWIwHhcNMjMwNzIxMDI0MTM4WhcNMzMwNzE4MDI0MTM4WjBrMQswCQYDVQQGEwJDQTEMMAoGA1UECBMDb250MRAwDgYDVQQHEwdUb3JvbnRvMRIwEAYDVQQKEwlNeUNvbXBhbnkxDjAMBgNVBAsTBU15T3JnMRgwFgYDVQQDEw9kZW1vLm1hbmlhay5sYWIwggEiMA0GCSqGSIb3DQEBAQUAA4IBDwAwggEKAoIBAQDH8w19FnKIg6KkW1mwz3wYb9mOWjVzg+NkzyGi2bAjw+keLzc6rAm4g3gV3GMigRc7tOnQMDF7mKhWLYWEELQY59QXSzhkJNN3WWef+ZY7MnpZEn/BRo6mnwaAZ/kPyXE0ge8jUXy/VkyI9jyDrBej9w9J/6busnfJ+g/db0K+RMhPkf8kO7NYO0mEU8dlTkSta1undb3L/Bs1nT8XcDNSdO3980ZTAhrkfOyFwduUvPdBaxmZS6ZNS1EX3Z6dfVKD9QaM/rPkcZzxA/Cz/ra2q6r2IaT8cj3fUr4S1W5rQEXk1NB8SGhe3ByRDTlip+5CXyXYx9OG+34AMB0+piRnAgMBAAEwDQYJKoZIhvcNAQELBQADggEBABkaaW2F8kS4KoNGWoPv10U44Fkv9eFkR+sm5FeykUyhRR9g4CZVS+8RtTliYnqiLzy8NJVhZdgtkI7XlNyNjAD/gCu326zsmXJE3+R7XeyaPV9XEBrFZWVcMS7Ol0kJjGUIIYbBKdOFBC/XkHC+H5hPmXNRMVg7KKq5hj6h47xLg7Ugll4DwbYNECiIOK6+771vwhVkdseCeFbB/RTSLGbhxvD6jwY/pfQ1TJq3OOQIR9iAeW3qvyTfaiyOa0dwHrvKnHMegid05i3Hgf9Bp/tn8tUNNKhCOJ+eC4SRUNbgzjEg2fa0qnaK6M3F+GTrxYNCoCP0aRm/bBX0corUXOI=\n-----END CERTIFICATE-----
Order/Approve and check if it worked.
Update AS3 VIP
Let’s update an AS3 Build
There are many cases where we need to update a cert, pool members ..etc so lets update our as3 we built
- Jump into the ‘F5 Build Virtual Server’ Catalog Item
- Under Action select ‘Update’
- Under ‘What is the name of the application?’ type the name of the app ‘demoas3’
- Under ‘Update the AS3 tenant’ type the name of the tenant ’tenant_demoas3’
- select the seach box
Watch the f5 MID server API make the calls
…
Clean up
Clean up
Let’s clean up the environment. Execute the following code
terraform destroy
…